Tarun BatraDeveloper2024-02-10T05:58:01.495Zhttps://tarunbatra.com/Tarun BatraHexoBehind the scenes at Access Requests: Worker taskshttps://tarunbatra.com/blog/x/behind-the-scenes-at-access-requests-worker-tasks/2023-11-20T08:00:00.000Z2024-02-10T05:58:01.495ZBackground
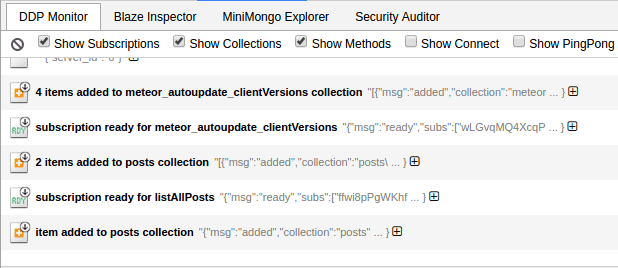
Okta’s inbox platform supports various products in Okta’s Workforce Identity Cloud, where human input is required. It is most notably instrumental in the Access Request flow of Okta Identity Governance.
A lot of what we do is trigger-based. These triggers can be a human action — “grant access when the manager approves” — or a time event — “revoke access **after 24 hours.**” This post will explain how we leverage asynchronous tasks using message brokers like Google Pub/Sub and Google Cloud Tasks to take actions based on these triggers.
Worker tasks
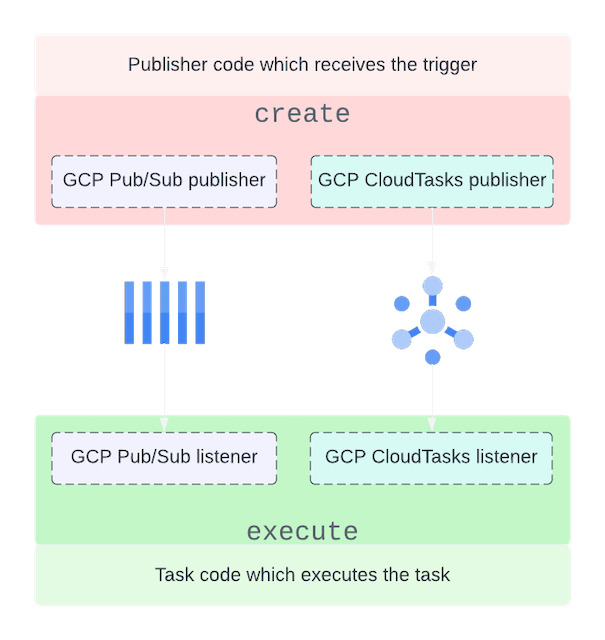
Internally, we call all asynchronous tasks “worker tasks.” We have an internal framework that exposes an interface to create and execute tasks while abstracting away the details of which message broker the task is sent to.
For us, a task is a function that needs to run, along with the metadata that dictates how it runs, in the worker tasks framework. From a conceptual perspective, a task is a collection of certain properties that determine its lifecycle and execution, as shown below:
Most of the metadata is self-explanatory. The driver defines the queue service to route the task from the publisher to the subscriber. In the above example, we are using GCP PubSub with the “fast_queue.”
NOTE:We use Google Cloud Tasks because of its built-in capability to delay the execution of tasks. In all other respects, our Google Cloud Tasks setup is similar to that of Google Pub/Sub. From here, the article focuses on Google Pub/Sub, and similar principles apply to Google Cloud Tasks as well.
Queue setup
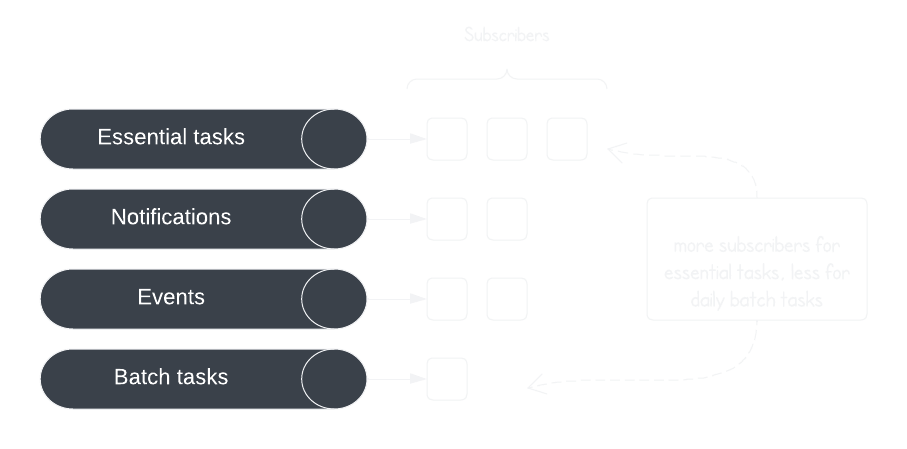
Our Pub/Sub setup handles a diverse set of tasks. We’ve set up multiple GCP PubSub queues that allow us to segment the workloads based on traffic characteristics, priority, and the domain of the workload. We do this to ensure:
High-priority tasks get executed faster.
Backlog in processing one domain’s tasks does not affect those of another.
This allows us to scale selectively depending on the task priority. In high-traffic situations, we can easily scale the subscribers for essential tasks and ensure stable platform health while allowing the existing number of notification subscribers to process through the notifications, resulting in slightly delayed notifications.
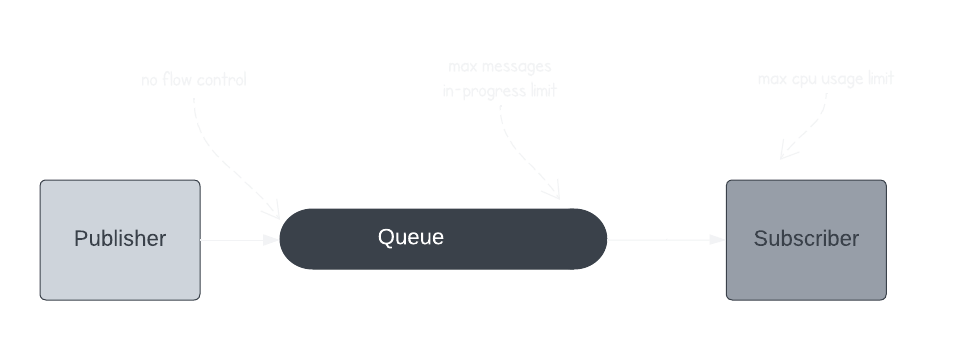
Flow control
In the previous example, we saw how the queue setup allowed us to scale in certain situations and accept delays in others. Practically, it’s likely that without scaling, the subscribers would get overwhelmed with the increased number of tasks and crash. We solve this by using flow control in various steps. The queues are configured with a maximum number of pending messages they can deliver at a time. This setting allows our subscribers to gracefully handle traffic bursts by managing the flow of incoming tasks.
Unfortunately, it’s hard to nail a magic number of tasks subscribers can handle. Other factors, besides the quantity of tasks, may affect the load, like the complexity of a particular task. Hence, as a failsafe measure, the subscribers are forced to stop accepting more tasks if resources like CPU and memory surpass a certain threshold. In such an event, the PubSub retries exponentially. It’s a naive but effective way to handle as many tasks as possible without crashing the subscribers or scaling up the number of active subscribers.
Trade-offs
Like any other system, there are trade-offs in this architecture. Customers choose Okta because it’s a reliable and neutral vendor. We have the following expectations from our asynchronous task infrastructure.
+ Extensibility
The framework is highly extensible. We can add a new queue service like RabbitMQ, AWS SQS, etc, by adding a driver, making all our tasks compatible with the new services.
+ Reliability
Having a central framework designed with reliability in mind means every new kind of task added to the system gets alerts on failures, dashboard reports, and anomaly detection by default without the task developer needing to do anything.
+ Granular scalability
With our tasks organized into queues based on priorities and domain, we can identify the patterns in delays and make informed decisions about which subscribers need to scale. This process frees our users from staring at loading screens while keeping our infrastructure spending in check.
- Retrying failed tasks
Many tasks in our system have side effects and are not idempotent. Such a task is challenging to recover in case of failure. We run the risk of having double side effects. The framework does not currently have a way to recover or retry these tasks.
What’s next
Our current asynchronous task setup works for our current scale and infrastructure needs. In the future, we’ll be looking to use Google Cloud Functions, which will take the flow control out of the equation. Cloud Functions can scale as needed to process the number of tasks.
Another future improvement we’ve flagged is to increase confidence around “exactly-once” execution of tasks with side effects, like sending emails, which would require using idempotent vendor APIs and more granular checkpoints throughout task execution. Our current architecture provides a good base for these improvements to come.
This article originally appeared on Okta on November 20, 2023.
]]>Okta's Inbox platform provides base for products like Access Requests and PAM. This post describes the trade-offs in the pubsub infra that supports the Inbox platform.macbook.init(): a dev machine set-up guidehttps://tarunbatra.com/blog/x/macbook-init-a-dev-machine-setup-guide/2022-09-10T21:05:39.000Z2022-10-02T06:52:22.426ZI started a new job, and I am excited. I get a new MacBook delivered and after keeping the delicate wrapping paper intact during the intricate unboxing, it dawns upon me that it is not my MacBook. It is a brand-new system devoid of all the custom tools that make my (work) life easier. On top of it, I do not even remember what those tools were, to begin with. Was it oh-my-zsh, or was I using fish? What did I do last time to get the top bar show Bluetooth? I end up setting small things like these, slowly every day, until it becomes all familiar, and I forget about them.
Not this time, I said to myself. As I start working at Okta, I decided to log the steps to set up my system, mostly for future me, but also for anyone else stumbling on the same StackOverflow articles over and over again.
Update OS
Yeah, just update the OS now that you have patience. It is probably outdated and the next step may require it.
Install Xcode
Do not wait on some CLI tool to fail on you later and install Xcode now. Might get lucky running xcode-select --install.
Install Firefox/Brave
Use Safari to install Firefox and Brave and log into them. Also set up extensions like -
Restore dotfiles and customize vim and other things.
Next steps
At some point, I should figure out that something is wrong with the trackpad and check that box that says Tap to click in settings. This is a living document and I will keep adding things to it, as I find. Now I should get back to that new system I just configured and get some work done!
]]>As I started my new job, I decided to log the steps to set up my system, mostly for future me, but also for anyone else.Integrating with third-party vendors – what can go wronghttps://tarunbatra.com/blog/software/integrating-with-third-party-vendors-what-can-go-wrong/2021-08-30T20:07:07.000Z2022-10-02T06:47:57.108ZThings are bound to go wrong when integrating two systems, more so when one of these systems belongs to a third-party vendor that you have no control over. I have experience with integrating vendors and managing these integrations. I am ranting here about the common patterns I have noticed in such integrations.
What you see is NOT what you get
You have integrated with the vendor, and the tests are passing. Everything looks good until you start getting reports from customer service that some of the users are seeing weird characters in their names. Jöhn Doé becomes J�hn Do�. We all have seen these characters at least once on the Internet. These characters appear when strings encoded in an encoding format are decoded with a different and incompatible format. Most of the time, we deal with UTF-8 which is a common text encoding format. However, there are legacy systems that use other, close but not quite the same standards. The bigger and older the vendor is, the higher the probability of them using an obsolete text encoding standard.
In my experience, most of the time, it ends up being a windows equivalent of popular standards, like windows-1252 for ASCII, and UCS-2 for UTF-16. I won’t try to explain the differences between these encodings and why they exist because it will only give a false impression that I understand them; I don’t. Hence my encoding of choice is WTF-8. Enough rant about encoding; coming back to the topic of vendors. Large vendors using Windows or IBM servers are likely to use these less popular encodings. So it is always good to clear that out with them.
Log ‘em all
The vendor system integration has been deployed and running successfully for a while. Suddenly you get paged that your system is behaving unpredictably and causing issues in the vendor system. You can not see anything wrong at your end and ask for logs to determine the issue. To your horror, the vendor does not keep logs, and you are on your own to fix the issue or prove there is no issue to begin with. To avoid such a scenario, I encourage logging more than required. All the points where control flows from your code to an external entity or the other way around should have excessive logging. Example:
1 2
2021-09-12T10:29:32.387Z [info] (api.js:5): Sending data to vendor X {"url":"https://vendor-x.example.com/system-y","data":{"tickets":[{"userId":"4567899","count":2,"date":"12/09/2021"}]}} 2021-09-12T10:29:32.388Z [info] (api.js:10): Response received from vendor X {"data":{"status":"success","ticketID":"GTY789"}}
Example of logging everything that goes out or comes in.
Duplicate requests are coming
You have just started your week on a Monday morning with a cup of coffee when you notice that everything in the system is happening twice, and sometimes thrice. Some services are constantly alerting because they can not process duplicate events. Most of the time, these alerts are good. The problem is the services that are processing these duplicate events instead of alerting. This could lead your communication service to send multiple emails to customers or the billing service to charge the consumers more than once. Hours of debugging later, you hear the news that the vendor found the issue in a new version was released last weekend with a botched retry system.
The solution to this is building idempotent systems which can process duplicate events gracefully. While idempotency will allow your systems to stay afloat in a situation like this, the excessive logging we added in the previous step should help in debugging and communicating to your vendors.
1 2
2021-09-12T10:54:14.261Z [info] (api.js:6): Request received from vendor X {"route":"POST /tickets","checksum":"e4608c43cfeede8f0ccd0f770305ec01b94ba554d72b7ff8a6e659bfdf6727a9","data":{"tickets": {"userId":"4567899","count":2,"date":"12/09/2021"}]}} 2021-09-12T10:54:14.262Z [info] (api.js:12): Duplicate request received from vendor X. Ignoring it. {"route":"POST /tickets","checksum":"e4608c43cfeede8f0ccd0f770305ec01b94ba554d72b7ff8a6e659bfdf6727a9","data":{"tickets":[{"userId":"4567899","count":2,"date":"12/09/2021"}]}}
Example of ignoring duplicate requests based on checksum
Concurrency is a privilege
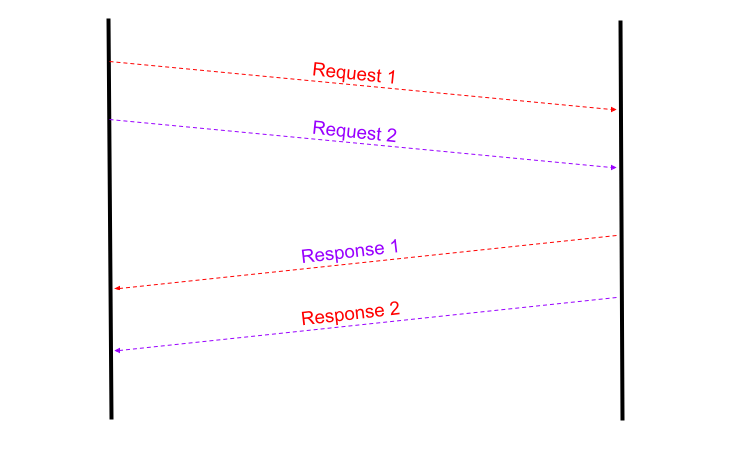
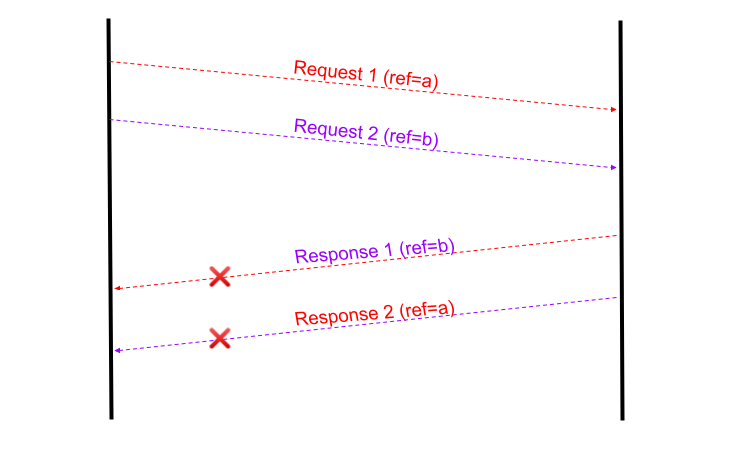
Modern APIs and systems are web-scale, that means they can handle multiple sessions, requests, and processes at the same time. This is called the concurrency of the system. Generally, banks and other financial institutions limit the number of concurrent sessions by the same users to one. This could mean different things in the backend. Good APIs have well-defined limits on this concurrency and throw expected errors when this limit is breached. Poorly designed APIs have unclear limitations on concurrency and can result in undefined behavior on their breach. One such situation which left me doubting everything was when a vendor could not handle multiple requests at the same time and it would often mix the response of two requests. It sent the response to one request in the channel created by another HTTP request.
Response 1 is sent in the channel created by Request 2 and vice versa
What I found helpful in a situation like this is tagging the requests with a reference. If the vendor system can echo back the reference sent in the request along with the response, it could be used to identify the discrepancy.
Matching the ref sent in request (a) with the one in response (b) helped identifying the issue
Firefighting the firewall
You just got hold of the endpoint for the vendor system, and you hook it into your application. It should work as-is, and in most cases, it would, but sometimes it would not. You would confirm with the team on the vendor’s end if it’s a firewall issue, but they would say it is not. At this point, you will start exploring everything, including the TLS version, self-signed certificates, network timeouts, keep-alive header, loadbalancer issues. You get the picture. You ask the developer team of the vendor again and this time they escalate your issue to the network team, which says, of course, it is the firewall.
Some firewalls require whitelisting of IP addresses, which would require you to get hold of “permanent” IPs like AWS Elastic IP addresses. After your IP addresses are whitelisted, it should be good to go. Some firewalls are configured to strip some headers, making you wonder why your requests are ending up as “unauthorized”. Figuring these issues could be hard if there are not enough logs and communication between the teams.
Parting notes
Well, I may have painted a grim picture here, but it’s just a rant about all the things that can go wrong (and have gone wrong) when integrating with external systems. Things are rarely this bad if there is good documentation. I hope reading this will prompt you to ask more questions when you integrate with your vendor and save time.
]]><p>Things are bound to go wrong when integrating two systems, more so when one of these systems belongs to a third-party vendor that you havPublish eBook using Markdownhttps://tarunbatra.com/blog/x/publish-ebook-using-markdown/2021-06-01T19:18:06.000Z2022-10-02T06:47:57.108ZYou want to publish an eBook, maybe upload it to the Kindle Store or read it on your iPad as an epub file, or maybe just read it on your Linux system as a PDF. I wanted to do the same and was looking for a way in which I can do it using my preferred writing format, Markdown, without having to lock myself in a SaaS. When I started searching, it became clear Pandoc was the way to go.
Pandoc is an awesome tool to convert documents from one format to another and it supports a lot of the formats. Due to it being highly configurable it can be difficult for someone new to start using it. So I will try to explain how you can utilize it for creating documents like ebooks just using Markdown. Though it should work similarly for other formats too.
Structure
Broadly there are three things required to get started.
A config file which will tell Pandoc how to render the data, for example, do we need a TOC in the ebook, if yes then what should be the maximum depth of it?
A metadata file which will contain information like author name, copyright, etc.
Markdown source file(s) which will form the content of the ebook.
📝 NOTE: I already have a base repository that you can use as a starter for your book which you can fork and get going. Do not forget to change the Author name though. ;)
Installing Pandoc
Pandoc is the only tool you need to get started with your ebook. Pandoc’s installation guide has the most up-to-date information on how to get it on your system.
If you are an Ubuntu user, most probably the following command will do the job:
1
apt-get install pandoc
For Mac users:
1
brew install pandoc
Config file
A config file can be used to manage all the options passed to pandoc without passing each option through the cli. Here’s an example config file.
config.yml
1 2 3 4 5 6 7 8 9
metadata-file:metadata.yml# file to use for metadata table-of-contents:true# enabling table of contents toc-depth:1# setitng max depth of 1 for table of contents number-sections:true# we will prefix headings with numbers variables: documentclass:scrbook# supported values: book, scrbook, article, etc. fontsize:14pt classoption:openany# disable empty pages in PDF papersize:a4
Metadata file
Your book will have some metadata like title, author name, copyright. All of that goes in the metadata.yml file. An example file will do a far better job in explaining than I can.
The cover photo provided here will be used as the cover photo of the ebook. More options can be found in Metadata docs of Pandoc.
Source files
You can write chapters in Markdown files. To preserve the order of the files, I suggest prefixing the name of the file with chapter number. It will ensure that the ordering of files is correct when you view it. The source files can also be individually passed to pandoc.
In the starter repo, all the Markdown files added to the src will be picked up and used as chapters of the book sorted in alphanumeric order. The images can be added to the images directory (or any other directory; I like to have my images in one place).
Thanks to the Makefile in the starter repo, generating an ebook is as simple as make epub and similarly make pdf can be used for generating a printable PDF version of the book.
The best part about using pandoc is that it supports a lot of formats formats and options, for example - custom css can be used to generate documents, if needed! I hope this gives you enough confidence and sets you on your eBook journey!
]]><p>You want to publish an eBook, maybe upload it to the Kindle Store or read it on your iPad as an epub file, or maybe just read it on your Git before Githubhttps://tarunbatra.com/blog/x/git-before-github/2020-10-24T21:17:54.000Z2022-10-02T06:47:57.107ZBack when I was studying CS at university, we had assignments to code various algorithms. When the assignments were due we were supposed to execute the code in laboratory systems and get the output checked by the professors. I liked coding and tinkering with the algorithms; some of my classmates didn’t. They used to copy the code from my system on a USB stick and execute them on their system and get done with it. I didn’t judge them but I was tired of giving each one their copy and sometimes also instructing them how to execute that piece of code. In one such assignment, I uploaded the code on GitHub and shared the link with anybody who asked. Unknowingly, I had made my first open source contribution.
A lot of people have similar stories and for most, Github is synonymous with Open Source. One thing that is also used interchangeably with Github is git. Even though these are three different entities, a lot of developers including me have never contributed to open source or used git without Github. Thus I was surprised when I learned that famous open source projects like Linux were not on Github even though they used git. Also, git was around before Github, so there must be other more native ways in git to get things done. I wondered how it worked but didn’t do anything about it until recently when I decided to experience a git only development workflow.
Git server access
We use version control systems broadly for two use cases – to contribute to a repository where we have write access; to contribute to a public repository where we don’t have write access. To collaborate with developers to whom access can be given, Github or other platforms are not necessary. Anybody can host a Git server that can be used to host repositories. Developers can clone, push to, and pull from these remote repositories once access is granted to their ssh identity.
1
git clone origin git@<host>/<repo>.git
This is similar to how we upload our SSH keys to Github or other platforms for being able to clone the repositories using SSH.
Pull requests
One thing which is missing in the above-mentioned method is the ability to create Pull Requests, get them reviewed and merged into the code. It becomes a big issue when the developers don’t have write access to the repositories as is the case in open source development. General open source flow is to fork a repository, push the changes in your forked repositories, and create a pull request to the original repository from where the maintainers can review and merge. Pull request is not a feature of git, but of platforms like Github. Collaborative development in git has the following steps:
Clone the original repository
Create a patch
Send the patch to the maintainer
The maintainer applies the patch and pushes the code
We introduced two new processes in this workflow – creating a patch and applying a patch. Let’s discuss them further.
Patch
A patch is a diff of code and metadata around it. A diff is the actual code change which can be viewed using the command git diff. It is a Unix concept that is way older than git and Unix systems even have a builtin tool, diff which compares changes between two files. Its output can then be saved to a file that can be processed by another utility tool called patch which updates one of the files to make its content identical to another file.
Now that we understand the concepts of diff and patch, we can proceed with using them in git. To generate a patch file in git, we need to use git format-patch command.
1
git format-patch HEAD~1..HEAD
This will create a patch file for the latest commit. Tinker with the argument to produce patch files for other commits too. By default, each file represents a single commit and the file name is of the format 0001-<commit message>.patch. Interestingly, it is in Unix mbox format which means it has some email-like metadata (from, subject, etc.) followed by the patch data.
0001-Added-Tarun-Batra-to-contributors.patch
1 2 3 4 5 6 7 8 9 10 11 12 13 14 15 16 17
From 619814a3ac21012580e725136864e8397c14e20b Mon Sep 17 00:00:00 2001 From: Tarun Batra <tarun.batra00@gmail.com> Date: Tue, 20 Oct 2020 23:15:32 +0200 Subject: [PATCH] Added Tarun Batra to contributors
This is the patch file I created to add my name to the contributors’ list of the git-before-github repository as an exercise for myself.
Apply
We have a patch file which we can send to the maintainers so that they can apply the patch. We can either use traditional ways to send the patch or use git itself, but more on it later. In this section, we will explore the process to apply a patch.
git apply <patch file> is a command which applies the changes described in the patch file locally but does not commit them. They will appear in our workspace and we can stage them and commit them. This is not ideal as even though we get the changes, the commit metadata like author name and message is lost. A better way to apply patches is git am (abbrev. for “apply mailbox”).
1
git am --signoff <patch file>
The flag --signoff is used if the commit message needs to be appended with a “Signed-off-by” line to indicate who applied the commit. Below is the signed-off and applied commit for the patch we generated as an exercise in the last section.
Now we can explore how to send a patch file to a maintainer in the “git” way. There are two ways that I know of –
imap-send
1
git imap-send <patch file>
It will upload the email to an IMAP folder from where it can be sent. To use it we need to add IMAP server details in our ~/.gitconfig file. I use Gmail so my IMAP details look like:
1 2 3 4 5 6
[imap] folder = "[Gmail]/Drafts" host = imaps://imap.gmail.com user = email@gmail.com pass = yourpassword port = 993
Gmail allows its IMAP server to be used if the Less secure app access setting is turned on.
send-email
1
git send-email --to=<email> <patch file>
It will use an SMTP server to send email. The corresponding config to use this command is:
Both of these methods can be used to send an email per patch file. The subject of the commit by default is of the format [PATCH] <commit message>.
NOTE:Sender email addresses can be spoofed quite easily and this raises the question of authentication and authorization when submitting patches. I tried creating patches of PGP signed git commits but the patch doesn’t retain the PGP signature. We could encrypt the email itself using PGP but that’s a lot of extra work for both the contributor and the maintainer.
So what can we do with this newly acquired knowledge?
Git patches often floataround in the Linux development mailing list and it gives me satisfaction that I understand how they work a little better now than before.
When platforms like Github and Gitlab have an outage, work in most of the development teams stall. Now I know a way to get my code reviewed even in these situations. (Okay, that might be a stretch)
EDIT: About when this article was published, youtube-dl was taken down by Github due to a DMCA request. The whole episode brings to light that Github being a platform is subject to censorship, unlike git which is distributed.
You can practice for yourself by adding your name to the CONTRIBUTORS.txt file of the git-before-github repository, committing it, and then sending me the patch. I would readily merge apply it. 😀
]]>Have you collaborated over git without using platforms like Github? I haven't either. But git is distributed in itself so it is possible and here is how.PyPi packages decoded for npm developershttps://tarunbatra.com/blog/python/PyPi-packages-decoded-for-npm-developers/2020-08-31T18:00:00.000Z2022-10-02T06:47:57.107ZIf you are a developer in Javascript / Node.js ecosystem, you have used npm. It’s the world’s largest software registry and the ecosystem around it is advanced and mature. I realized it when I tried to port password-validator, an open source npm package I maintain, to Python. I spent weeks to figure out things which were very intuitive to me in the Javascript world. This blog will list down some of the key differences I found between the two ecosystems for anybody else who treads the same path. By the end of this post, we should be able to install our package using:
1
pip install <my-awesome-package>
What is a package?
In npm, any folder which has a package.json file is a package. In Python world, we need a file called setup.py in the root folder to make our project a package for PyPi, a common repository for Python packages. This file is used to declare meta data like name, version, author, and even dependencies (with a catch). Look at this sample setup.py file to get an idea.
Normally, the actual package code goes inside a directory with the package name and it is required to have a __init__.py file in it to indicate that it is a module. So the directory structure would look more or less like:
In this structure your actual package code will go in __init__.py and/or any other python file in this directory like lib.py.
Dependency management
Dependency management is one area where I found Python ecosystem lacking and primordial. npm has concepts like dependencies and devDependencies and package-lock which make dependency management easier. The manifest file setup.py has a section called install-requires which is a list of the dependencies required to run the project. These dependencies are downloaded while installing the package using pip. It’s not very widely used to define the exact dependencies and dependencies of dependencies.
Instead, a combination of a virtual environment and requirements file is used.
Virtual environment
npm allows installing packages globally or local to a project. In pip, all packages are installed globally. To separate the local dependencies from system-wide packages, a virtual environment is created which contains all the dependencies local to the project and even a local Python distribution. Code running in a virtual environment doesn’t require any system dependency, so one can be assured that the code should run in all systems wherever the local virtual environment is set up correctly.
There are multiple ways of setting up a virtual environment, like venv and virtualenv. I found former to be the easiest to use.
1
python3 -m venv <dir>
The above command creates a virtual environment in directory <dir> which means this directory will house everything required to run the program including Python and pip distributions. This directory needs not be committed to version control. To use the virtual environment, it has to be “activated”.
1
source <dir>/bin/activate
Requirements file
Every virtual environment has its own pip and Python distribution. So it’s a clean slate when you start. When we install dependencies, we can make a log of them using:
1
pip freeze > requirements.txt
This will log all the packages and their versions installed by pip in the file requirements.txt. The file name can be anything but it’s a convention in the Python community to use this name. There is no concept of devDependencies in Python but it’s not uncommon for some projects to have a requirements-dev.txt to log devDependencies of the project. Here’s a sample requirements file.
Installing a project’s dependencies now can be done with:
1
pip install -r requirements.txt
Documentation
JSDocs is the most common way to document code in JavaScript and the list of documentation tools alomst stops there. Documentation in Python is taken very seriously.
Sphinx
Sphinx is a documentation generator for Python which can be used in various ways thanks to a variety of extensions available. To get started with sphinx, we need a conf.py file which will have configuration for sphinx. The file can be generated using sphinx-quickstart CLI utility. Here’s a sample conf.py file to get started.
Sphinx and Python ecosystem prefers using reStructuredText (reST) for documentation instead of Markdown which is common in the JavaScript world. M↓ can be used with Sphinx too, but it’s a bit of work and reST is very similar to M↓. Here’s a sample README in reST.
Docstrings
Sphinx can look through special comments in Python code and include them in the documentation. These comments which are called Docstrings are used to describe functions, classes etc. and are very similar to JSDocs in JavaScript and JavaDocs in Java. Here’s a method documented with Docstrings:
1 2 3 4 5 6 7 8 9 10
defadd(a, b): ''' Performs addition of 2 numbers Example: >>> res = add(1, 2) 3 Returns: int: Result of addition ''' return a + b
There are a number of formats for writing Docstrings, which can be a topic discussion in itself. I found myself going back to this guide by RealPython and I recommend giving it a read for a deeper understanding of Docstrings. Using the combination of reSt files and Docstrings, we can generate documentation using Sphinx in a form like PDF and HTML. Here’s a sample HTML documentation generated using Sphinx.
There are less popular alternatives to Sphinx which can also be used for documentation, most notable being ReadTheDocs.
Tests
I found writing unit tests in Python easier than in JavaScript due to the availability of mature and built-in tools.
unittest
Python has a built-in module unittest which can be used to run the tests. The syntax is very similar to Jest or Mocha. Every “test” is a class and every class method is a test case. Methods like setUp() and teardown() have special meanings and are equivalent to before and after methods seen in JavaScript testing frameworks. Here’s a sample test file. Tests are run by:
1
python3 -m unittest discover -s <test_directory>
Pytest and nose2 are some of the alternatives but I found unittest adequate.
Doctests
Earlier in Documentation section, we discussed about Docstrings. The Examples section in a Docstring provide the user an understanding of how to use the function. What’s great is we can also run the example against an automated unit test, using doctest (another built-in module). This can keep the documentation and implementation in sync.
Publishing
Packages can be publushed to PyPi after building. Earlier the builds were made in Egg format, however now it is being replaced by Wheel format. To create a wheel build, we need to install setuptools and wheel.
The Real Python. I recommend clicking on any link from this website which comes up in search results.
It was an interesting experience for me to tackle all the challenges faced when I was on a journey to publish my first package on PyPi. A mature testing frameworks was a breath of fresh air while dependency management and documentation generation was a daunting task due to all the different tools to manage. In the end I published password_validator and I am happy with the result.
Do reach out in comments or on my Twitter if you have any issues with the steps I have mentioned here. Happy publishing!
]]>Step by step guide to develop Python packages and comparisions with npm ecosystem. I deployed my package on PyPi and here's what I've learned.Deploy your website on IPFS: Why and Howhttps://tarunbatra.com/blog/decentralization/Deploy-your-website-on-IPFS-Why-and-How/2020-04-18T22:00:00.000Z2022-10-02T06:47:57.106ZPhoto by Clint Adair on Unsplash
I wanted to learn about IPFS and Web 3.0 so I started exploring it and tried to upload my site there. This is an account of the concepts I learnt along the way and how I finally got my site hosted on tbking.eth. I’ll give a brief intro about IPFS and why hosting static content there makes sense. If you are already familiar with IPFS, you can skip to the hosting part.
What is IPFS
Inter-Planetary File System is a decentralized network of shared content. It has a very simple yet interesting design philosophy:
Build a network that works inter planets, and it will be a better network for communication across Earth too.
IPFS is a decentralized network where peers are connected and share files, in many ways like BitTorrent. The fundamental principle is that unlike the traditional web, where files are served based on their location, in IPFS files are served based on their content. Consider this comparison:
Google’s privacy policy is identified as a file hosted on Google’s servers on the address https://policies.google.com/privacy. The content of the policy doesn’t matter. This is called location-addressing. On the other hand, IPFS identifies files by their content, using the hash of the file. Let’s say you want to read the “XKCD #327 - Exploits of a Mom“. Its IPFS address is https://ipfs.io/ipfs/QmZVjV5jFV7Jo4Hfj6WPyRnHCxf8kbadkqtQBco2gef64x/. This address doesn’t depend on the location of the server but the hash. This is called content-addressing. Whoever cares about XKCD, can host it. This makes broken links unlikely, which is also one of the goals of IPFS.
IPFS docs explain these concepts well. I recommend them to anyone who wants to dig deeper.
Hosting on IPFS
Deploying static content such as personal websites on IPFS is easy. The steps I’m listing below can be used for any file such as a plain HTML file, a website generated by static site generators like Jekyll, Hugo, Hexo, and Gatsby or even a media file. So let’s dive in.
Adding files
IPFS Desktop
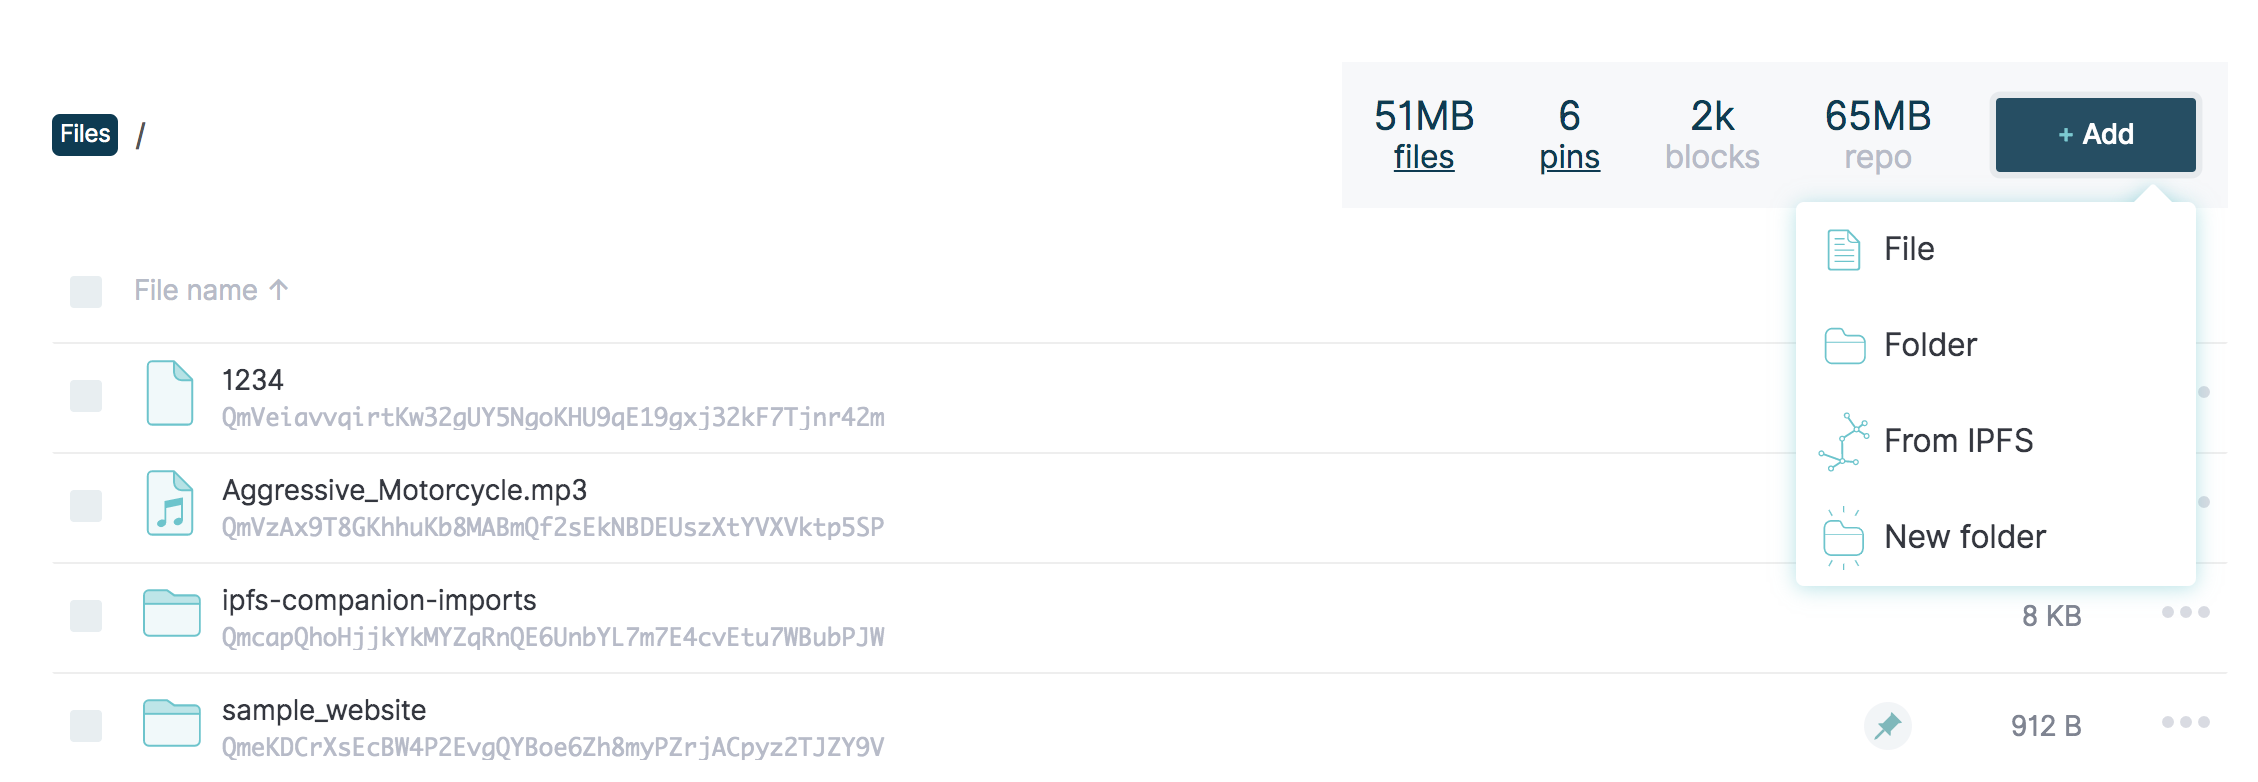
If you have IPFS Desktop installed and running, you can add your files using a normal file selector. Just import the directory which has the contents of your static website.
Right-click on the newly added content and select Copy CID. Open https://ipfs.io/ipfs/<cid> to see our files on the web! 🚀
Easy right? 😀
IPFS CLI
IPFS CLI allows adding of files and directories using add subcommand.
TIP: It is important to use relative links in your website since IPFS gateways have a URL which looks like <gateway>/ipfs/<cid>/file.ext.
Pinning
In the last section, we added files to our IPFS node for the network to find. This is why the IPFS gateway was able to resolve it and show it in the browser. But the site will most likely become unreachable once you shut down your IPFS daemon. Even though, after requesting some content on IPFS, the receiving node also becomes a host of the content, but the content will be garbage collected after 12 hours. How to serve your site round the clock in a decentralized web without a server?
A node that pins some content on IPFS hosts it forever (until it unpins it). There are pinning services like Pinata which pin the files on their IPFS nodes. This way the website is available always. In Pinata, you can either upload a file or just provide it’s hash if the content has already been uploaded to IPFS. Here’s how I pinned the sample website we uploaded above.
TIP: It is good to pin your site using multiple pinning services for redundancy.
Automated deployments
As you might have noticed already, using IPFS is very easy. I would go as far as to say it’s easier than dealing with the traditional web that we use. However, this process has to be repeated every time you want to change your files which is not very ideal. There are tools like Fleek which help in automating all the steps listed above.
Fleek is like Travis or CircleCi for IPFS deployments. You can link your Github account with it and using the Github hooks, Fleek will trigger a deployment on every push to the Github repository. They also pin everything they deploy.
So I use Hexo to generate this blog and I was able to add a build step in the Fleek dashboard itself so that I don’t need to generate the HTML and push to my repository. Here’s the build command that I use:
1
git submodule update --recursive --init && npm i && npm run build
Yes, I needed to install the submodules myself. They don’t do that by default (yet). Check it out, it’s super easy.
Link to a domain
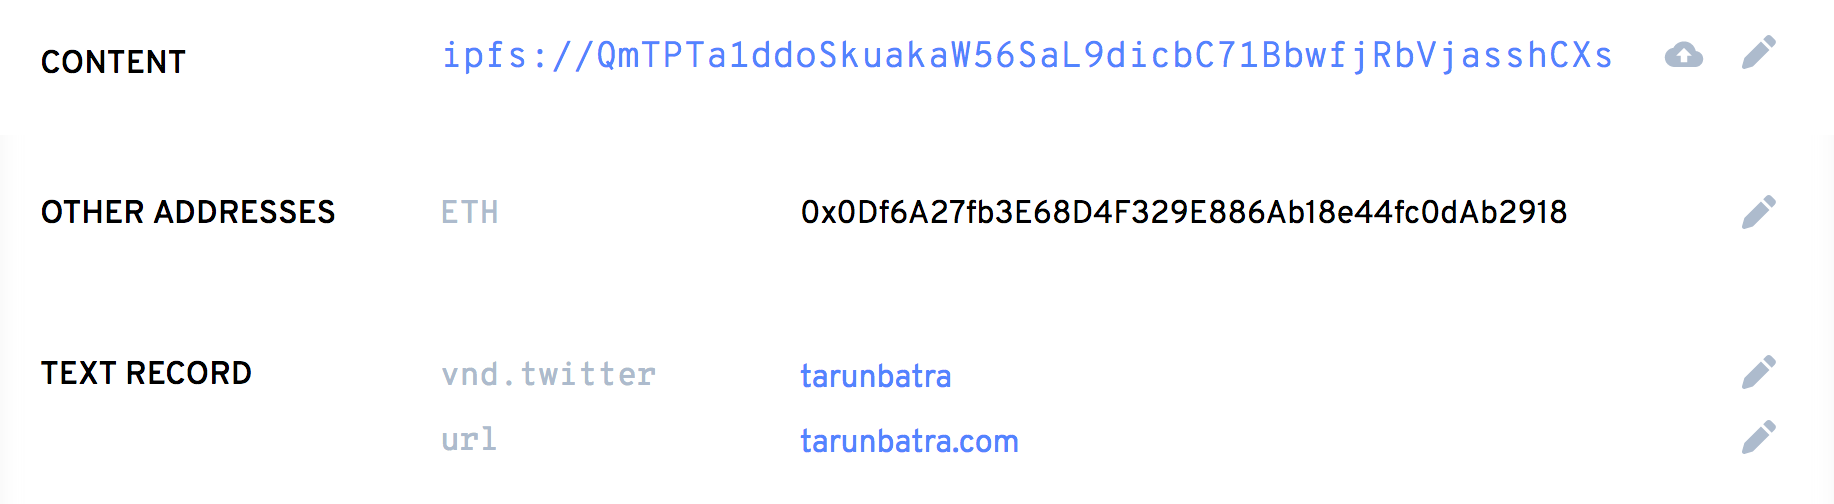
So now we have our site up and running, but content on IPFS is not as easy to look up as on the traditional web. My site can be found at https://tarunbatra.com. But on IPFS, the current version can be accessed at https://ipfs.io/ipfs/QmTPTa1ddoSkuakaW56SaL9dicbC71BbwfjRbVjasshCXs/. You see the problem. This is not human readable. And the CID changes after every update. There are 2 solutions to this:
DNSLink
With DNSLink, you can point a normal domain to an IPFS content. It can be set up on Fleek very easily. I’ve pointed ipfs.tarunbatra.com to the IPFS version using Fleek and you’ll be able to open this site.
IPNS (Inter-Planetary Name Service) also exists and is similar to DNSLink but it’s much slower right now.
Ethereum Name Service
ENS is a naming service that lives on Ethereum blockchain and uses smart contracts to buy domains and set resolver records to them. Since Ethereum is involved, you’d need MetaMask to use it.
I bought the domain tbking.eth and pointed it to the IPFS CID of this site. With changing content, the resolver record of the domain also needs to be updated every time to point at the new CID. Good thing is, Fleek has recently integrated ENS. You can set Fleek as a controller for the domain and they will update the record automatically on each deploy.
Sweet! This was it. IPFS is perfect as the storage layer of the Web 3.0. Try for yourself, and if you liked this blog, share it, and maybe pin it! :)
]]>I deployed my website on the Web3 using IPFS and ENS. Here I'm detailing why that makes sense and how to do it.How to choose between Kafka and RabbitMQhttps://tarunbatra.com/blog/comparison/How-to-choose-between-Kafka-and-RabbitMQ/2019-10-12T02:00:00.000Z2022-10-02T06:47:57.107ZImage sourced from “Comparison: Apache Kafka VS RabbitMQ“ by CloudAMQP.
Kafka and RabbitMQ – These two terms are frequently thrown around in tech meetings discussing distributed architecture. I have been part of a series of such meetings where we discussed their pros and cons, and whether they fit our needs or not. Here’s me documenting my findings for others and my future self.
Spoiler: We ended up using both for different use-cases.
Message Routing
With respect to message routing capabilities, Kafka is very light. Producers produce messages to topics. Topics can further have partitions (like sharding). Kafka logs the messages in its very simple data structure which resembles… a log! It can scale as much as the disk can. Consumers connect to these partitions to read the messages. Kafka uses a pull-based approach, so the onus of fetching messages and tracking offsets of read messages lies on consumers.
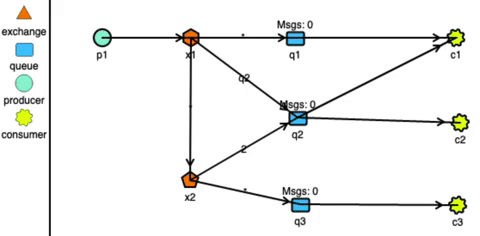
RabbitMQ has very strong routing capabilities. It can route the messages through a complex system of exchanges and queues. Producers send messages to exchanges which act according to their configurations. For example, they can broadcast the message to every queue connected with them, or deliver the message to some selected queues, or even expire the messages if not read in a stipulated time. Exchanges can also pass messages to other exchanges, making a wide variety of permutations possible. Consumers can listen to messages in a queue or a pattern of queues. Unlike Kafka, RabbitMQ pushes the messages to the consumers, so the consumers don’t need to keep track of what they have read.
RabbitMQ routing simulated using http://tryrabbitmq.com
- - -
Delivery guarantee
Distributed systems can have 3 delivery semantics:
at-most-once delivery
In case of failure in message delivery, no retry is done which means data loss can happen, but data duplication can not. This isn’t the most used semantic due to obvious reasons.
at-least-once delivery
In case of failure in message delivery, retries are done untill delivery is successfully acknowledged. This ensures no data is lost but this can result in duplicated delivery.
exactly-once delivery
Messages are ensured to be delivered exactly once. This is the most desirable delivery semantic and almost impossible to achieve in a distributed enviornment.
Both Kafka and RabbitMQ offer at-most-once and at-least-once delivery guarantees.
Kafka provides exactly-once delivery between producer to the broker using idempotent producers (enable.idempotence=true). Exactly-once message delivery to the consumers is more complex. It is achieved at consumers end by using transactions API and only reading messages belonging to committed transactions (isolation.level=read_committed). To truly achieve this, consumers would need to avoid non-idempotent processing of messages in case a transaction has to be aborted, which is not always possible. So, Kafka transactions are not very useful in my opinion.
In RabbitMQ, exactly-once delivery is not supported due to the combination of complex routing and the push-based delivery. Generally, it’s recommended to use at-least-once delivery with idempotent consumers.
NOTE: Kafka Streams is an example of truely idempotent system, which it achieves by eliminating non-idempotent operations in a transaction. It, however is out of the scope of this article. I recommend reading “Enabling Exactly-Once in Kafka Streams” by Confluent if you want to dig in it further.
Throughput
Throughput of message queues depends on many variables like message size, number of nodes, replication configuration, delivery guarantees, etc. I will be focussing on the speed of messages produced versus consumed. The two cases which arise are:
Queue is empty due to messages being consumed as and when they are produced.
Queue is backed up due to consumers being offline or producers being faster than consumers.
RabbitMQ stores the messages in DRAM for consumption. In the case where consumers are not far behind, the messages are served quickly from the DRAM. Performance takes a hit when a lot of messages are unread and the queue is backed up. In this case, the messages are pushed to disk and reading from it is slower. So, RabbitMQ works faster with empty queues.
Kafka uses sequential disk I/O to read chunks of the log in an orderly fashion. Performance improves further in case fresh messages are being consumed, as the messages are served from the OS page cache without any I/O reads. However, it should be noted that implementing transactions as discussed in last section will have negative effect on the throughput.
Overall, Kafka can process millions of messages in a second and is faster than RabbitMQ. Whereas, RabbitMQ can process upwards of 20k messages per second.
Persistence
Persistence of messages is another front where both of these tools can not be more different.
Kafka is designed with persistent (or retention as they call it) in mind. A Kafka system can be configured to retain messages – both delivered and undelivered, by configuring either log.retention.hours or log.retention.bytes. Retaining messages doesn’t effect the performance of Kafka. The consumers can replay retained messages by changing the offset of messages they have read.
RabbitMQ on the other hand, works very differently. Messages when delivered to multiple queues, are duplicated in these queues. These copies are then governed independently of each other by the policy of the queues they are in, and the exchanges they are passing. So to persist the messages in RabbitMQ:
queues and exchanges need to be made durable,
messages produced need to be tagged as persistent by the producer
Not to mention, this will have performance impact since disk is involved in an otherwise memory operation.
Conclusion
RabbitMQ offers complex routing use-cases which can not be realized with Kafka’s simple architecture. However, Kafka provides higher throughput and persistence of messages.
Apart from these differences, both of them provide similar capabilities like fault-tolerance, high availability, scalability, etc. Keeping this in mind, we at smallcase used RabbitMQ for consistent polling in our transactions system and Kafka for making our notifications system quick and snappy.
]]>Kafka and RabbitMQ are two very popular message queues based on very different design principles. Which one of these suits your project?Polling reliably at scale using DLQshttps://tarunbatra.com/blog/architecture/Polling-reliably-at-scale-using-DLQs/2019-07-16T09:00:00.000Z2022-10-02T06:47:57.107ZOriginally published at blog.smallcase.com on July 16, 2019.
Execution of computer programs is blazing fast. It’s only practical to need some delay in execution. Some of such use cases are:
scheduling a task for sometime in future;
retrying a failed task with a backoff stratagy
At smallcase, we place orders to buy or sell equities on clients’ behalf. When the order is placed, it’s execution status is not immediately known. We need to poll the partner broker to know the status of order on the exchange.
Intraday traders will tell you that stock markets are time sensitive. Any platform that caters to them needs to be fast and deterministic. Polling for order status needs to happen in a timely manner after regular intervals because an endless loading is never a pleasant sight.
This blog explains the reliability issues we faced with our legacy system for scheduling polling and how we fixed it.
Delay mechanisms:
We will discuss the following delay mechanisms we used in our platform:
This approach is very simple. We heavily use Redis in our stack, so it was easy for us to use it for scheduling triggers. Redis allows to set keys with expiry using its SETEX command. For instance, setting a key TESTKEY with value TESTVALUE and expiry of 10 seconds can be achieved with:
1
>redis SETEX TESTKEY 10 "TESTVALUE"
Parallely, Redis provides Keyspace notifications for data changing events which can be subscribed by clients and can be used to trigger the delayed tasks. Key expiry events can be subscribed using:
1
SUBSCRIBE __keyevent@0__:expired
Pros:
Stateless application code. The application doesn’t need to store the tasks to perform and delays in its memory. It is outsourced to Redis.
Arbitrary delays. Delays of arbitrary length are possible without any extra configuration. Just changing the ttl paramter of SETEX command will work.
Cons:
Unscalable. This strategy works only till there’s only one instance of the application listening to these events. In case this application is to be horizontally scaled, each instance of the application will receive the event because of its publish-subscribe nature.
Unreliable. The keyspace notifications can get highly unreliable as the number of keys increase. This is clearly mentioned in the docs:
If no command targets the key constantly, and there are many keys with a TTL associated, there can be a significant delay between the time the key time to live drops to zero, and the time the expired event is generated.
This worked fine for us in the beginning. But once the orders increased, a lot of clients started reporting really long waiting periods before they could see the status of their orders. On debugging, we saw delays of the tune of 40x and this was the deal breaker for us.
In-memory Timers
As a quick fix to this we used in-process timers. Timers are defined and executed by the application code itself and can be used to manage delays. Node.js provides a variety of in-built timer functions. Setting a 10 second timer is as simple as:
Arbitrary delays. Delay time is controlled by the time argument only. Passing the required delay time in milliseconds is all that is required.
Reliability. Timers in code are quite reliable. Deviation of only upto few milliseconds is observed.
Cons:
Stateful application code. The application adds to its state whenever a timer is set up. It also increases memory footprint of the application.
Unscalable. In-memory timers do not work well with horizontal scaling. Timer will always trigger the instance which set it in the first place, irrespective of the traffic distribution across the instances.
Timers worked well to mask the problem until we had bandwidth to think about the problem and fix it for good. Now we needed a permanent and reliable solution that would scale.
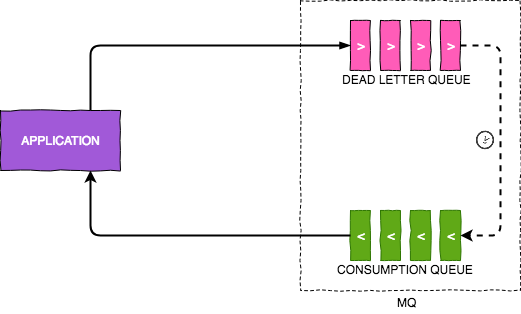
Dead Letter Queues
After researching a bit about this topic, we decided to try Dead letter queues. DLQ is a sophisticated but robust way to delay message delivery used in message queues like Amazon SQS, RabbitMQ and ActiveMQ.
In very basic terms, a message with an expiry is put into a queue. The queue is instructed to take some action if the messages are expired without being read. We can instruct these expired messages to be pushed to a different queue which is actively consumed by the target application and it simulates sdelayed delivery of message. Following diagram explains this concept:
Polling delay mechanism
We chose RabbitMQ based on AMQP 0-9-1 for our implementation due to maturity of the protocol and its community.
Pros:
Stateless application code. The application doesn’t need to store any state. The messages in the queue represent staete in this case.
Scalable. Unlike redis events, message delivery in MQs can be configured to use worker pattern which loadbalances the consumers (subscribing instances of the application) to deliver the message.
Source: RabbitMQ docs
Reliability. Message Queues are expected to be highly reliable in delivery of messages. In our testing with RabbitMQ, the results were found to be close to in-memory timers.
Cons:
Fixed delays. In RabbitMQ’s implementation of DLQs, the TTL is bound to the queue and applies to all the incoming messages. There is a way to set message level TTL but it has its own caveats. One of the most serious side-effects of using message-level TTL is that a message with higher TTL will block the queue and delay the processing of messages with lower TTL behind it, which is a bigger problem. Hence, we are using DLQs with queue level TTL.
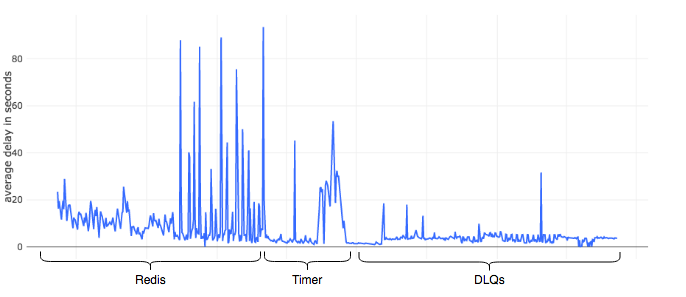
The chart shown below analyzes the average delay observed in resolving the orders we handled in the past year and its relation with the delay mechanism being used.
Graph showing consistency in the polling scheduled using RabbitMQ DLQs
It is clear that the polling delay in Redis was large but consistent to start with but grew out of proportions quickly as the volumes increased. This was quickly fixed using timers but like all quick-fixes, it had a short life too. Finally, we revamped our systems and used DLQs.
It is evident from the graph that DLQs brought consistency to the system.
We traded flexibility with robustness and reliability by using DLQs to manage the delays in our polling for order status. If you’ve solved a related problem in any other way, do let us know in the comments.
❤️ code
]]>How we bid goodbye to long waiting times during order execution on smallcase platform.Restore deleted MongoDB documents using Oploghttps://tarunbatra.com/blog/data/Restore-deleted-MongoDB-documents-using-Oplog/2018-06-14T23:05:00.000Z2022-10-02T06:47:57.107ZSource: Dilbert
Recently I found myself trying to restore corrupted data to it’s original form. A query gone wrong had erased valuable data from a MongoDB collection and it needed to be restored. This blog is a means to note my learnings from that incident for my future self and others.
Oplog is amazing
If you’re using a MongoDB replica set, you can use MongoDB Oplog to undo almost any type of recent data loss. If you never heard of it, go read the docs as I’ll skip to the restoring part.
The oplog is a special capped collection that keeps a rolling record of all operations that modify the data stored in your databases.
Restore backup
Restore whatever latest backup you have before the the data was corrupted. It’ll be used as a base. Make sure the oplog has operations from or before the time the backup was taken, otherwise the restore may not work.
Find the faulty query/queries
Now you need to browse the contents of the Oplog and look for the query which corrupted the data in the first place. Oplog is a special collection, but still a collection. So, you can query it to narrow down your results like this:
mongodb shell
1 2 3
Replica:PRIMARY> use local switched to db local Replica:PRIMARY> db.oplog.rs.find()
The value of oplogLimit paramter is the ts property of the faulty query you noted earier.
Mongo oplog is idempotent, i.e. it can be applied multiple times without duplicating data. This is why you need not give mongorestore a start time.
Selective restore
The previous method helps when the good and bad operations are clearly separated by time. But that’s not the case mostly. It’s likely that the good and bad writes happened around the same time.
Here, you need to remember that Oplog is a collection too, and in addition to be queried on, it can also be modified. You need to copy oplog to an uncapped collection and delete the bad write operations.
After you’ve removed all bad operations you can continue the restoration process from a dump of the modified oplog. But this time, no limit argument would be required.
Hope this helps!
❤️ code
This post is inpired from resources like Asya’s stackoverflow answer which was used to solve the problem at hand.
]]><p><sup>Source: <a href="http://dilbert.com/strip/2013-07-05">Dilbert</a></sup></p>
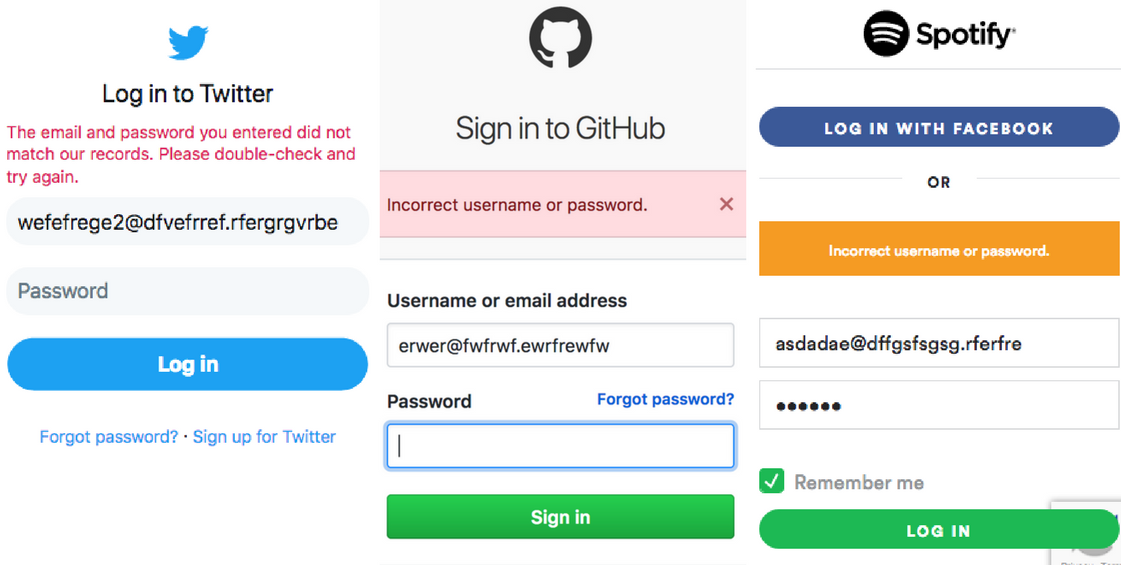
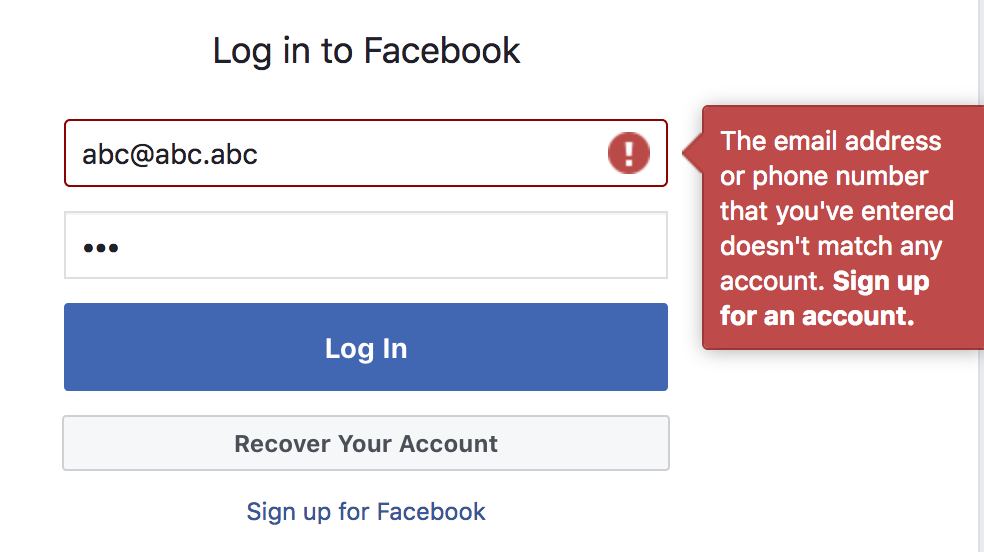
<p>Recently I found myself trying to restore corrupted dError messages in login process: Privacy and Securityhttps://tarunbatra.com/blog/security/Error-messages-in-login-process-Privacy-and-Security/2018-04-28T22:44:03.000Z2022-10-02T06:47:57.106ZMost of us, while developing sites swear to the rule of making error messages shown to the end-user as specific as possible, which goes a long way in creating a friendly UX. But the same rule if used in the login flow, can have significant privacy and security implications. On entering wrong login credentials, most sites show variations of Invalid username/password error at the login screen.
It can be safely assumed that no user for such emails exists, yet the error messages shown by these prominent sites don’t indicate that. Do you see why?
Protecting user base information
On feeding random emails, a simple login/reset password may show that the user doesn’t exist and therefore no login/reset password is possible. A hostile client may create a list of valid users from this information. Not every site cares about it though. Facebook doesn’t.
It doesn’t hurt for a site like Facebook to leak the user base because everyone’s on it, but when the site is something like Ashley Maddison it can have implications.
Closing the loop
People often argue that the user base is anyways leaked during the registration process, which can’t continue if the user already exists. This leak is avoidable too, by continuing the registration through an email. If the user already exists the email may say so, otherwise it may direct the receiver to continue the registration process.
Deterrence to brute-force
In a brute-force attack, large number of combinations of usernames and passwords are tried to get into a user’s account. A dictionary attack is faster and better as it takes advantage of human tendencies of using common passwords and re-using old passwords. Specific messages like Invalid username make these attacks faster by eliminating large number of combinations in a few tries.
Demo
To quantify the difference detailed error messages can make to brute-force or dictionary attacks, I created a script, login-attack-demo which included:
A server which gives out specific error messages based on the failing stage of the login process. If the username is invalid, it’d say Invalid username.
Smart server
A server which gives out vague error messages on failure of the login process. If the password is invalid and not the username, it’d still say Invalid username/password.
Attacker
A hostile client which uses the dictionary to generate a pair of username and password and uses them to break into the system. It also analyzes the error messages on the following rules:
An error message saying the password was invalid, indicates the username was a valid one.
An error message saying the username was invalid, indicates no combination of password will result in a successful login.
An inconclusive error message is ignored and the next combination is tried.
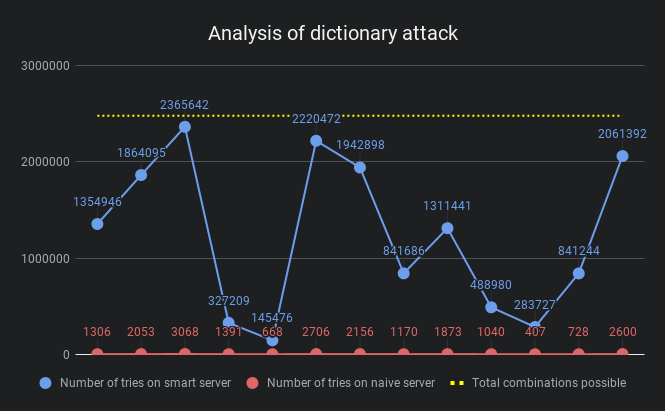
Results
The blue points indicate the number of tries it took the attacker to break into the user’s account with vague error messages, while the red ones are when the error messages were specific. The yellow line is the max number of combinations to try.
It is evident that in theory vague error messages make it quite tough for the attacker, sometimes as much as 1000 times tougher. However, plugging all the holes may make the UX far from ideal. In the end, it all comes to trade off between UX and security. Depending on the space you’re operating, such methods can be used to safeguard the users.
]]><p>Most of us, while developing sites swear to the rule of making error messages shown to the end-user as specific as possible, which goes aGetting Started with Microserviceshttps://tarunbatra.com/blog/architecture/Getting-Started-with-microservices/2017-07-17T23:00:00.000Z2022-10-02T06:47:57.106ZOriginally published for Codebrahma on Jul 18, 2017.
Microservices is a vague term which usually points to small independent services which together form up an application. Microservices architecture stands in contrast to Monolithic architecture, where the application is one big system. We will discuss about how to get started as a beginner and choosing the right tools for setting up microservice architechture.
Rapid Rise in popularity of Microservices
Microservices have recently risen into popularity, as suggested by this Google trends index:
“microservices” in Google Trends
Before getting into what they are, and how to use them, let’s find out why microservices are rising into popularity even though it’s not a new concept. This can be explained by Conway’s Law which states that:
Organisations which design systems … are constrained to produce designs which are copies of the communication structures of these organisations
Until recently majority of companies were used to be giant enterprises, making equally giant enterprise software, or monoliths. Not anymore. Since last 5 years, companies are getting more distributed in nature. In fact, some of the new unicorns like Automattic and Gitlab are entirely distributed. That explains why microservices are rising in popularity.
Why Microservices?
Fewer compromises in tech stack
Choosing a tech stack is always a tough call. Skills of the team, scalability, maintenance are all important factors in this choice. But many times what’s good for one portion of the app, is not good for the other.
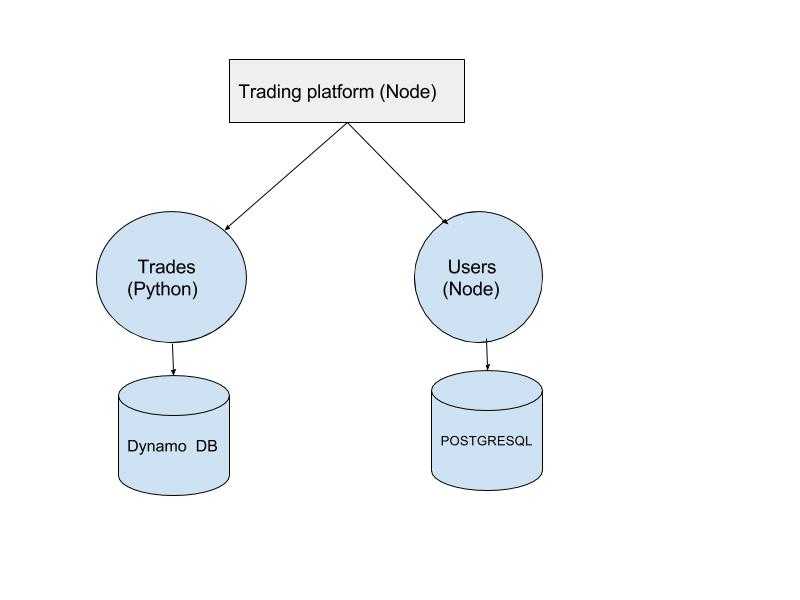
For example, a trading platform needs PostgreSQL due to support for transactions, the user specific data has to be stored in DynamoDB. Generally, a trade off is made. But in Microservices Architecture, each microservice owns a set of business logic and related data in the form it deem best, and provide an interface to interact with it. So there can be microservices for trades and users each, with data hosted on PostgreSQL and DynamoDB, and access to external services is allowed only through the interface. So a computation intensive microservice can be written in Python while the API Server remains in NodeJS, and so on.
A sample architecture would look like
Independent teams
In a monolithic application, most of the people in a development team needs to know all the parts of the application even to develop a small feature. They have to collaborate with other teams on deployment schedules, versioning, data migrations, etc. On the other hand, in Microservices Architecture the teams just need to know the interface provided by other services and stick to the interface provided by theirs. Each microservice should be independently deployable. CI/CD tools like CirclCi, Travis and Heroku are of great help while developing microservices. To develop/maintain a service, a small team with limited knowledge is enough.
Do one thing and do it well
Microservices Architecture also resembles the Unix philosophy’s principle, Do one thing and do it well. It is a principle which has proved it’s worthiness and is one of the reasons Unix-like systems are not obsolete even after decades. Microservices should be designed to do one thing, tested to handle all the possible scenarios and then “piped” together to form a robust and flexible application.
Fault isolation
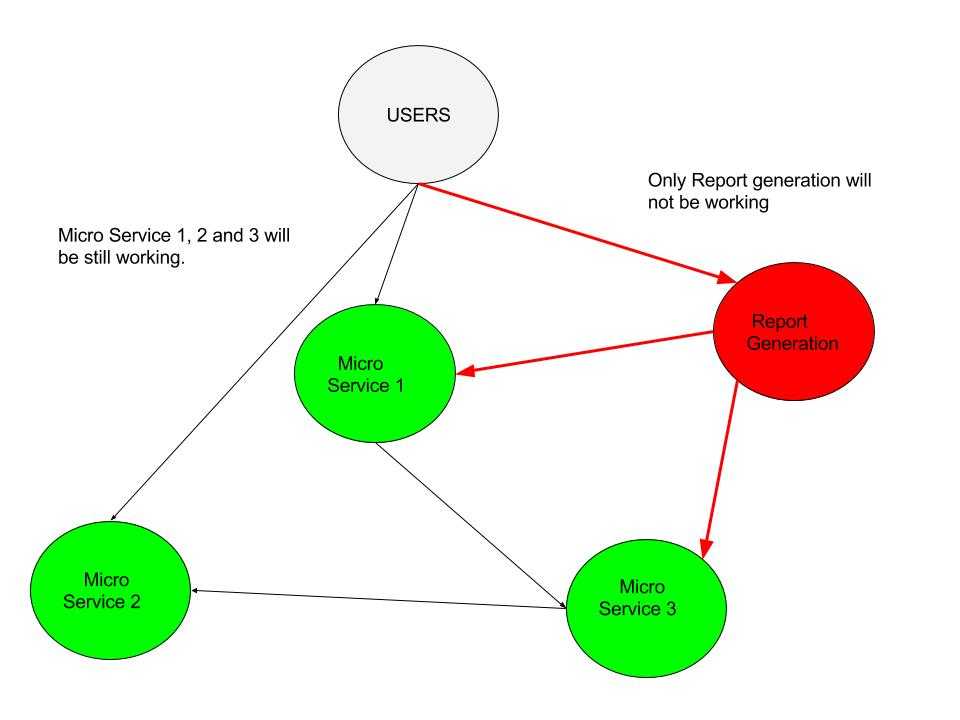
Imagine error in a report generation module, takes the full trading application down. It’s terrible and unnecessary. If the application is based on microservices, the report generation module will fail, taking down only that specific feature. Users who are not generating reports won’t even notice, and the critical parts of the application will still be working. That’s a result of Loose coupling between microservices, now achievable through this architecture.
How to develop Microservices?
In Node.js, Seneca is a widely used framework to develop microservices. But if you want to get yours hands dirty, read on.
API Gateway
Microservices can be deployed without a main central service, but sometimes a thin central layer is usually kept to have shared libraries. Sometimes it also works as an API Gateway. An API Gateway is used to provide a consistent API to the client side irrespective of the backend service, and vice versa. It is helpful when you have multiple microservices catering to clients like mobile, web, other servers, etc. Also it prevents client to make requests to multiple services by abstracting it into one request.
Inter-service communication
How should these services communicate to each other?
HTTP: Well, there are plenty of options. Most straightforward is to use HTTP/HTTPS and the interface can be made as RESTful APIs. Though, HTTP makes service discovery difficult and less dynamic. That’s a reason I don’t prefer it.
Message Queues: Message Queuing protocols like AMQP, STOMP and MQTT allows the use of publish subscribe pattern for communication between microservices. Services like RabbitMQ and Apache Kafka are widely used for this purpose. I personally prefer using Message Queues as they are fault tolerant and support message persistence.
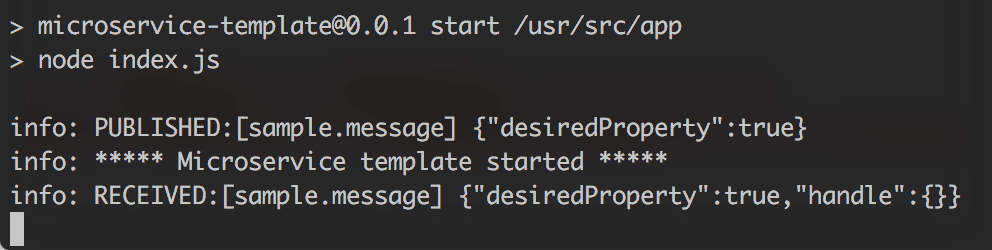
microservice-template is a basic boilerplate which we use in our projects based on Microservices. It’s in Node and has MongoDB configured as a data store. It connects to RabbitMQ for inter-service communication via servicebus. Here’s how it looks in it’s bare minimum:
Microservice booting up and communicating
There are other concepts like Event Sourcing and CQRS which complement the Microservices Architecture. Event Sourcing is basically storing the changes to the data, instead of the changed state of the data. in a highly concurrent environment, event sourcing brings consistency of a higher order.
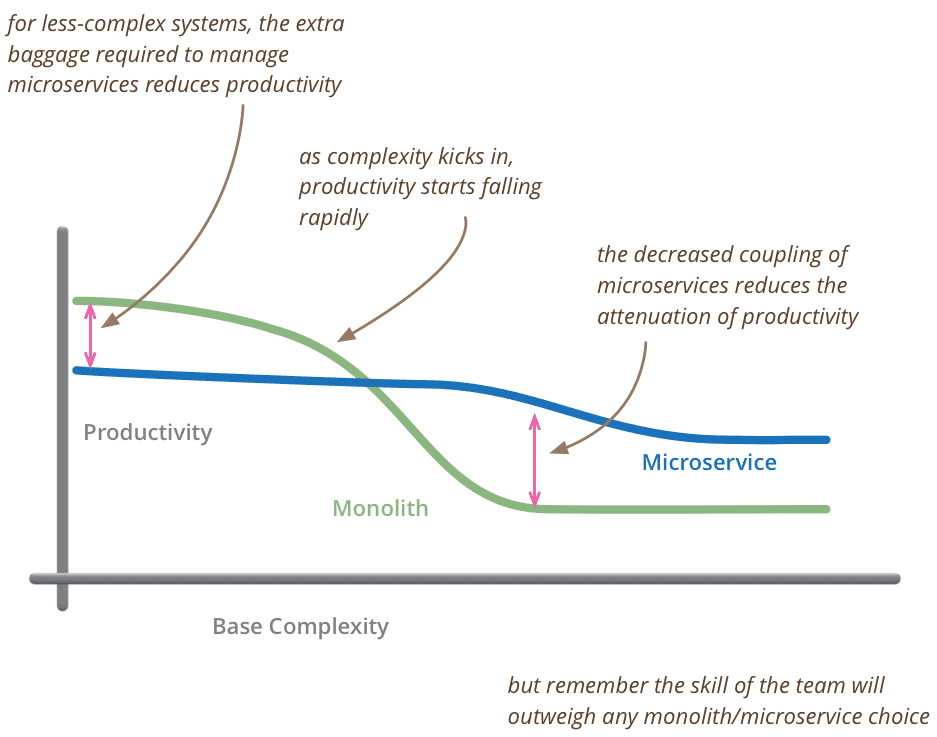
Productivity in Microservices vs Monolothic Architecture Source: Martin Fowler
But truth be told, Microservices Architecture is no silver bullet. Using microservices for fairly small apps can lead to loss in productivity, as evident in the above graph.
❤️ code
]]><p><sub>Originally published for <a href="https://codebrahma.com/microservices-for-beginners/">Codebrahma</a> on Jul 18, 2017.</sub></p>
<p>Pitfalls of Mocha's built-in Promise supporthttps://tarunbatra.com/blog/javascript/Pitfalls-of-Mocha-s-built-in-Promise-support/2017-04-19T00:11:12.000Z2022-10-02T06:47:57.107ZMocha is the leader when it comes to testing frameworks in Node, and it’s great. I use it in all my projects, and I’m sure many others do too.
Mocha added support for Promises back in version 1.18.0. Recently while testing asynchronous code written using Promises, I was using the built-in promise support instead of the old-fashioned callbacks oriented done callback and I found my tests were resulting in false positives. So here I’m explaining what happened and how to avoid it.
Problem
It’s easy to see that there are four possible cases when testing Promises:
The test expects the promise to resolve and so it does. The snippet above shows that the test passes expectedly.
Case 2
1 2 3 4 5 6 7 8 9
var promise = Promise.reject(newError('some-error'));
describe('the promise rejects unexpectedly', () => { it('should FAIL the test', () => { // => Error: some-error return promise.then(() => { console.log('Promise resolved!') // Not called }); }); });
Test status: FAIL
In the case when test expects the promise to resolve, but it doesn’t, Mocha gracefully fails the test. In the snippet above, the then block was never executed and Mocha detected the error rejected by the code and failed the test.
Case 3
1 2 3 4 5 6 7 8 9
var promise = Promise.reject(newError('some-error')); describe('the promise rejects expectedly', () => { it('should PASS the test', () => { return promise.catch(() => { console.log('Rejected promise caught!'); // Called }); }); });
Test status: PASS
The test expects the promise to be rejected and it is caught by the catch block, which results in this test passing as expected.
Case 4
1 2 3 4 5 6 7 8 9
var promise = Promise.resolve();
describe('the promise resolves unexpectedly', () => { it('should FAIL the test', () => { return promise.catch(() => { console.log('Rejected promise caught!') // Not called }); }); });
Test status: FAILPASS
In this case, the test expects the promise to be rejected and the catch block to execute but instead, it doesn’t. The promise resolves. Mocha doesn’t throw an error here!
So while doing Negative Testing, the built-in promises support doesn’t hold up well and can result in false positives. This is not a bug and the reason behind this behavior totally makes sense, once given a careful thought, but at the very least, it’s not intuitive and causes the tests to pass even when they shouldn’t.
Solution
Good ol’ done callback
The simplest way to avoid this situation is to always handle the rejection scenarios yourself, rather than asking Mocha to do it. Here’s how:
1 2 3 4 5 6 7 8 9 10
var promise = Promise.resolve();
describe('the promise resolves unexpectedly', () => { it('should FAIL the test', (done) => { promise.catch(() => { console.log('Rejected promise caught!') // Not called done(); // Timeout! }); }); });
Test status: FAIL
The above test will fail due to timeout as Mocha waits for done to be called but it doesn’t, and times out eventually.
Chained then block
Another way to avoid this situation is to chain a then block to the existing catch block and assert that the catch was called.
1 2 3 4 5 6 7 8 9 10 11 12 13
var expect = require('chai').expect; var spy = require('sinon').spy; var exceptionHandler = spy(); var promise = Promise.resolve(); describe('the promise resolves unexpectedly', () => { it('should FAIL the test', () => { return promise.catch(exceptionHandler) .then(() => { // Assert that catch block was called expect(exceptionHandler.calledOnce).to.be.true; }); }); });
Test status: FAIL
The above test tries to assert that the catch block was called using Chai and Sinon, and fails.
If you know other elegant ways to avoid this behavior, please let me know in the comments!
❤️ code
]]><p><a href="https://mochajs.org/">Mocha</a> is the leader when it comes to testing frameworks in <a href="https://nodejs.org/">Node</a>, andWhy you should use named functions in JavaScripthttps://tarunbatra.com/blog/javascript/why-you-should-use-named-functions-in-javascript/2017-02-26T23:59:36.000Z2022-10-02T06:47:57.108ZJavaScript functions can be categorized into named or anonymous on the basis of the value of their name property. A named function can be declared as follows:
1
2
3
4
5
functionadd(a, b) { return a + b; }
console.log(add.name) // => "add"
All other ways, including ES2015's much-touted [Arrow functions](https://developer.mozilla.org/en/docs/Web/JavaScript/Reference/Functions/Arrow_functions) produce anonymous functions. One of these ways is:
1 2 3 4 5
var add = function (a, b) { return a + b; }
console.log(add.name) // => ""
__NOTE__: If you tried the above code in Chrome Dev Tools, you would've noticed that the __name__ of the function is "add" even in the case of anonymous function. That's because modern-day interpreters are smart enough to recognize the name from the expression.
Now, what’s special about named functions?
Make sense with error stacks
Error and call stacks are a great help in debugging code. But the use of anonymous functions reduces the usefulness of the call stacks. We all have seen the infamous (anonymous) littered over the stack trace.
Of course, one can always look at the line number of the error, but with the ever-increasing pre-processing on the code (read Babel, WebPack, Browserify), this is not a reliable method.
JavaScript ecosystem is already confusing as is and the developer can use as much help as she can get to make sense of the obscure errors.
Use methods before declaration
While interpreting code, JavaScript looks for statements starting with function keyword (i.e. named function expressions) and move them to the top. This is called Hoisting.
So practically, a named function is available even before it’s declared, making the following code valid.
1 2 3 4 5
add(1, 2); // => 3
functionadd (a, b) { return a + b; }
But the following code won’t work.
1 2 3 4 5
add(1, 2); // => Error
var add = function (a, b) { return a + b; }
Improves readability
It’s fairly difficult to understand a callback function’s purpose in first glance. That’s what makes callback hell the problem it is. Look at the following jQuery code.
1 2 3
$('form').submit(function () { // ... });
The above code provides no information on what’s going to happen to the submitted form. Adding names to callbacks improves readability and acts as implicit documentation, as the following code does.
1 2 3
$('form').submit(functionhitAPI () { // ... });
Conclusion
In my opinion, there’s no reason one should not use named functions when possible. Most of the JavaScript style guides out there don’t give due importance to them. ESLint users can use func-names rule in their projects to require the use of named functions, and enjoy the benefits.
❤️ code ️
]]><p>JavaScript functions can be categorized into <em>named</em> or <em>anonymous</em> on the basis of the value of their <strong>name</strongIntroduction to Cryptocurrencieshttps://tarunbatra.com/blog/cryptocurrencies/Introduction-to-Cryptocurrencies/2016-08-16T22:50:00.000Z2022-10-02T06:47:57.107ZOriginally published for Codebrahma on Aug 17, 2016.
Unless you’ve been living under a rock, you’d have heard about cryptocurrencies or Bitcoin atleast. There’s a lot of buzz around it, but disproportionately less clarity regarding what it actually is. In this article we’ll introduce ourselves to the fundamental principles of cryptocurrencies, clear the mist of confusion which surrounds them, and debunking some myths along the way too.
It’s human nature to compare everything new with something familiar. In case of cryptocurrencies, it’s the fiat money. Money is so fundamental to our daily lives that we always manage to see through them, and seldom do we try to understand the reason we need it and the unique purpose the serve.
Look at those paper and plastic sheets, do you feel they’re worth it?
Now I’m not an economist, but I know few common principles which make currencies what they are.
Principles governing currencies
Demand and supply
Almost every financial and economic activity is affected by this principle. The more the ratio of demand and supply of a commodity, more is it’s value.
Market sentiments
Market sentiments greatly effect the value of the currencies, stocks and commodities. If the investors of a company think the company shares are going to be worth less, they are worth less.
Trust
Trust is essential for virtually all economic activity. Banknotes often have a promissory clause which reads like this:
without any gold or other precious resources to actually back that claim. (Earlier they used to back currency value to something like gold. Though it’s discontinued now, but the idea is same).
Why cryptocurrencies?
So we already have things in place to keep the system running, why do we need these cryptocurrencies? What problems do they solve, if any? Well the features of fiat money are also it’s limitations.
The banks represent a single point of control which can deem a currency illegitimate, refuting our claims to our wealth.
Apart from being a single point of control, they also represent a single point of failure. Banks have failed in the past, and can certainly fail in the future due to various reasons, which puts our wealth at risk.
We have to trust the system with our wealth without any satisfactory assurance against a fraud, intentional or otherwise.
Cryptocurrenies are an attempt towards liberating the monetary system, something so essential to our lives, from these issues, in a way that one can be in absolute control of one’s wealth without trusting the system.
Any discussion about cryptocurrencies is incomplete without Bitcoin. Bitcoin is to cryptocurrencies what PowerPoint is to presentation programs, Ubuntu is to Linux and Xerox is to photocopying. We will try to understand cryptocurrencies with a case study of Bitcoin, which is not very much different from other cryptocurrencies.
Bitcoin
Bitcoin is one of the first and certainly the most popular cryptocurrency, created by Satoshi Nakamoto(a pseudonym) in 2009. Many of the challenges which Bitcoin faced were first of their kind and success of Bitcoin paved the way for other cryptocurrencies.
Let’s see some of these challenges:
Eliminating central authority
Bitcoin protocol is based on a Peer-to-peer (P2P) network to eliminate the need of any central authority, just like how BitTorrent protocol, based on a P2P network, eliminated the need of any central authority for file sharing.
Eliminating trust
When we transfer money through banks, we trust them to do so. But without any central authority, or nodes which one could trust, it was necessary to create a trust-less system. Bitcoin used blockchains to achieve this. Blockchains are a type of distributed database which lives on ever node and are used as immutable public ledger for the transactions. Blockchains are made of blocks which further consist of bitcoin transactions. Blockchains are similar to a linked list of blocks where every block refer to it’s parent block and this fact makes old transactions very secure and incorruptible as we’ll see later.
Blockchains, themselves are greatly hyped and are considered the biggest achievement of Bitcoin, as the idea can be used in various other industries to create trust-less systems.
Value of bitcoins
If there’s no central authority, who decides the value of the currency?
Well, as we discussed earlier, the golden rule of demand and supply comes to play here too. Satoshi made the protocol in such a way that the maximum number of bitcoins that can ever be generated (minted) is fixed at 21 million.
Market sentiments also play a vital role. Recently bitcoin prices plunged when Bitfinex, a Hong Kong based cryptocurrecncy exchange was hacked and $65 million worth bitcoins were stolen.
Verification of transactions
Banks have interest in processing only valid transactions and keeping fraudulent transactions out of the system. This role is played by miners collectively.
Miners are the nodes which generate blocks for blockchains by verifying the unverified transactions and including them in their block.
The verification is done by adding Proof of work (POW) to the block data. Block data generally contains the transactions which form the block including the coinbase transaction and the hash of previous block.
Proof of work is a piece of data which is difficult to produce but easy to verify.
It’s generally the hash of block data with n number of leading zeroes. Miners append a value called nonce to the block data to change it’s hash value and keep changing the nonce until the desired hash is found.
So if the block data is Hello, world!, and the number of zeroes required is 4, it takes 4251 tries (nonce is incremented from 0) to find the desired hash:
Now anyone can verify that this is a valid hash of Hello, world!4251, but if someone tries to change a transaction in the block, the hash will be invalidated, and a new POW has to be generated, which is impractical.
We saw, finding POW can be a complex and a resource hungry process. So why do miners do that? Miners are incentivized for every block they generate. At the end of the block, the miner adds a special transaction called coinbase transaction which writes off a certain amount of bitcoins to the miner’s address from thin air, and that’s how new bitcoins are minted. Miners also get some money from the transactions, called transaction fee. The block, which is first to arrive, gets placed in blockchain, and other miners have to scrap their work, and start again after syncing with the blockchain.
Double spending
Let’s say Alice bought something from Bob, and paid him in bitcoins. What if:
Alice broadcasts the transaction, but alters the transaction in her own copy of blockchain to pay herself instead of Bob. Upon the verification of the transaction by the network, Bob ships the item. Now Alice broadcasts her own version of the blockchain.
Which version of blockchain should the nodes trust?
If Alice manages to convince the nodes that her version (without Bob’s transaction) is valid, she gets to buy the item without paying anything.
Various elements of Bitcoin protocol come at play to stop this from happening.
Bitcoin nodes trust the longest blockchain and build their blocks on it. If Alice wants to invalidate the current longest blockchain, she has to re-generate the blocks after her fraudulent transaction at such a speed that her blockchain becomes the longest one. As long as most nodes in the network are honest (they should be, they’re getting paid for it!), Alice can’t corrupt the blockhain, and this is why we introduced blockhains as immutable public ledgers earlier in the article. The number of blocks a transaction is buried under, is called the confirmations of that particular transaction. Most exchanges deem a transaction verified after 6 confirmations.
More the confirmations of a transaction, more difficult it is to alter it.
Anonymity
Many people hail Bitcoin as an anonymous mode of payment. But the reality is quite the opposite. Every transaction made on Bitcoin is visible to everyone. Having said that, bitcoin transactions don’t necessarily link to the real identity of the user, but to a pseudonym, much like writing a book with a pen name. Thus, Bitcoin is pseudonymous.
Fun facts about Bitcoin
The first block of the blockchain is called the Genesis Block. Every bitcoin in circulation is either derived from a coinbase transaction or the Genesis block. See how it looked like here.
Rewards from coinbase transactions are halved after every 210,000 transactions. In fact, the latest halving event occurred recently on 9th July 2016, reducing the reward amount from BTC 25 to BTC 12.5. Check when’s the next halving event here.
51% attack is a largely feared attack in Bitcoin, where an attacker controls 51% of the computational resources of the network, allowing it to alter the “immutable” blockchain. It ain’t plain theory, Read about Bitcoin’s brush with it here.
Altcoins
Cryptocurrencies other than Bitcoin are know as altcoins, or alternative to Bitcoin. Most of the altcoins are similar in principle to Bitcoin with some minor differences. Litecoin, Dogecoin, Namecoin and Nxt are some prominent altcoins.
The altcoins vary in terms of under lying principles. For example, Primecoin is a cryptocurrency which makes use of the vast amount of computational resources to find long chains of prime numbers which can contribute in advancement of cryptography as a science.
Ethereum is a disruptive blockchain-based platform, the highlight of which is smart contracts. Smart contracts are contracts enforced by computer code, instead of institutions set up by humans. This way, we can port whole economies and governments to digital ecosystem, let alone currencies. The possibilities are endless and out of the scope of this article.
Cryptocurrencies also vary in terms of user friendliness. More popular ones, like Bitcoin are very user friendly, while others are not so.
My bitcoin wallet app
You can see stark difference in my bitcoin wallet app shown above, and my Ethereum wallet shown below.
My Ethereum wallet
Conclusion
Cryptocurrencies are really trending and have a lot of buzz. The future of cryptocurrencies is very promising. Many people have made a fortune out of cryptocurrencies, however they should not be looked merely as an investment. The ideas which these cryptocurrencies represent and the future possibilities they hold are of far greater value than their monetary value.
If you’re thrilled and want to involve in bitcoins or cryptocurrencies in general, you may like the following links:
If you liked the article and feel generous, or just want to hone your newly acquired bitcoin skills, feel free to send me some bitcoins at the following address.
17ULzN8PCaCtE16WKtBhMYc28DQxxt4ja
❤️ code
]]><p><sub>Originally published for <a href="https://codebrahma.com/introduction-to-cryptocurrencies/">Codebrahma</a> on Aug 17, 2016.</sub></pMeteor Publications and Subscriptionshttps://tarunbatra.com/blog/javascript/Meteor-Publications-and-Subscriptions/2016-07-20T22:30:00.000Z2022-10-02T06:47:57.107ZOriginally published for Codebrahma on July 21, 2016.
Meteor is a full-stack JavaScript platform, in fact the 11th most popular JavaScript project on GitHub at the time of writing. What makes Meteor so disruptive is the mode of data communication between server and client. It’s not RESTful but instead, Meteor uses Publish Subscribe pattern to communicate data between server and client. The protocol used for this communication is Distributed Data Protocol (DDP), which is built in-house by The Meteor Development Group (MDG), the startup behind Meteor.
In this chapter specifically, we’re going to talk about meteor publications and subscriptions, and to explain these interwoven concepts, we’re going to use them in various scenarios and analyze their results using 3rd party tools to achieve a better understanding of how Meteor publications and subscriptions work and the ways we can use them.
Almost in every case, we’d need to publish a set of data from the server and subscribe to same in the client. Unlike conventional frameworks, Meteor server doesn’t serve HTML content, but the data which is used by the client to render the HTML. This feature is called data on the wire. The server sends a set of data to the client initially and then keep pushing new data as it changes in the database.
Code to publish all documents from a collection of posts
1 2 3 4 5 6 7
if (Meteor.isServer) { var Posts = new Mongo.Collection('posts');
Meteor.publish('listAllPosts', function () { return Posts.find(); }); }
Code to subscribe for all documents from a collection of posts
1 2 3 4 5 6 7 8 9 10 11 12 13 14 15
if (Meteor.isClient) { var Posts = new Mongo.Collection('posts');
Meteor.subscribe('listAllPosts', {
onReady: function () { // called when data is ready to be fetched console.log(Posts.find().fetch()); },
onStop: function () { // called when data publication is stopped } }); }
If you’re new to Meteor, you’d already be sweating seeing that we just created a Mongo Collection on the client. You’re right, it doesn’t make sense.
We actually created a MiniMongo Collection. MiniMongo is a client-side data store with a Mongo-like API. When we talk about server sending data to client, it’s MiniMongo we’re talking about.
Subscribed data in MiniMongo visualized using Meteor DevTools showing the 2 posts that were pushed to MiniMongo
When a subscription becomes ready, the data is stored in MiniMongo and can be accessed by Mongo-like queries. The server keeps the MiniMongo in-sync with the data in back-end by sending additional data as the data changes in the back-end.
Syncing of MiniMongo data through DDP showing 1 item being pushed to MiniMongo as it got added on the server
Updated MiniMongo data showing total 3 posts
Readying a subscription
As shown in the above code, when the subscription becomes ready, onReady callback is called. But when does the subscription become ready?
When a cursor is returned from the server in a Meteor publication, Meteor automatically makes the subscription ready after pushing the data from the cursor to the MiniMongo.
1 2 3
Meteor.publish('listAllPosts', function () { return Posts.find(); });
To make the subscription ready manually, or without returning a cursor this.ready() is used as shown in the following code snippet.
1 2 3
Meteor.publish('listAllPosts', function () { this.ready(); });
This informs the client that whatever records which needed to be pushed initially are pushed, and subscription is deemed ready.
Stopping a subscription
There are use cases when you may want the data not to be pushed to the client and the client to know that the subscription was stopped for some reason. How can that be done?
You can manually stop a subscription by calling this.stop() from the publish function. This will stop the subscription and call the onStop callback.
1 2 3
Meteor.publish('listAllPosts', function () { this.stop(); });
Another way to stop a subscription is to throw a Meteor Error from the publish function, which will result in the onStop callback being called with the error as the argument.
1 2 3 4 5 6 7 8 9 10 11 12
//server
Meteor.publish('listAllPosts', function () { thrownew Meteor.Error('some reason'); });
//client
Meteor.subscribe('listAllPosts', { onStop: function(err) { // handle the error });
Advanced concepts
Meteor publications and subscriptions work like a charm if used properly. Syncing data in the background and updating the same in real-time looks pretty good. But it offers much more. You can take control of what gets pushed, when and how.
To gain more control over the data you publish, you need to know what happens when Meteor publishes data. The following screenshot shows all the DDP messages which are exchanged between client and server of our sample Meteor app.
DDP messages showing the publication of data using Arunoda‘s DDP Analyzer tool
First, the client sends a DDP message to server subscribing to the listAllPosts publication.
Then the server pushes the first set of data using added message.
Next, the server readies the subscription using ready message.
Upon addition of data in the database, server pushes the new document using the same added message.
Now, if you’re paying attention, you’d know that we used this.ready() earlier to ready a subscription. It’s responsible for sending the ready message. Similarly, we have more methods which can be used to send the other kind of messages.
Adding a document
You can use this.added() in a Meteor publish function to manually send an added message. It’s signature is:
1
this.added(collectionName, documentId, fields)
Changing a document
Similarly, you can use this.changed() to change a document already pushed to the client. It’s signature is:
// Manually readying the subscription this.ready(); });
DDP messages after executing the above code
So, you can control the data you publish to the client. There are more interesting concepts, like intercepting a publication and changing the data but that’s out of the scope of this article.
Meteor publications and subscriptions make working with real time data easy and fun. To know more refer Meteor Documentation and after you’re done with that, maybe DDP specification too.
❤️ code
]]><p><sub>Originally published for <a href="https://codebrahma.com/meteor-publications-and-subscriptions/">Codebrahma</a> on July 21, 2016.</s